Building a Secure Amazon S3 Bucket
Blog Article Published: 09/23/2020
By Josh Stella, Co-Founder and CTO, Fugue
Originally Published at fugue.co/blog on Sept 8, 2020
Much has been said about Amazon S3 security on Amazon Web Services (AWS) in the press and technical publications, and much of it is oversimplified and of limited practical use. Amazon S3 is an incredibly simple cloud service to use, but adequately securing your S3 resources is anything but simple, as too many organizations have discovered.
In this post (and our two Cloud Security Masterclass sessions devoted to Amazon S3), I provide a pragmatic approach to understanding S3 security. You’ll be able to reason about securing your specific S3 use cases and build a secure S3 bucket that meets your particular needs.
If you go solely on what you read in the press, you might make the mistake of thinking that the only thing you need to do to ensure the security of your S3 bucket is Block Public Access. While getting this setting right is important (and AWS has taken needed steps to warn you if you have it wrong), it can also lead to a false sense of security if that’s all you do.
The Layers of Amazon S3 Security
There are several layers of Amazon S3 security, and some are more important than others.
- Access Control Points (ACLs)
- Identity and Access Management (IAM) Policies
- Bucket Policies
- Block Public Access
- Access Points
- Encryption
Of these, IAM Policies, encryption, and Bucket Policies are the most important to understand, at least at first. But before we get into the details of those policy types, it’s critical to have a mental model about policy and how it relates to actions and resources in AWS. We’ll skip over ACLs, as they are an artifact of history that AWS recommends you not use in most cases.
IAM Policies
In AWS, there are Principals, Actions, and Resources. Of course, there are other kinds of entities with AWS as well, but these are the ones you need to understand when designing secure S3 buckets.
- Principals are actors — both human and machine ones. They are the entities that make calls on Actions and Resources, along with credentials to do so.
- Actions are the API endpoints that we use to perform actions in the cloud. Each AWS Service has a collection of Actions, such as ListBuckets or GetObject in S3.
- Resources are the particular instances and objects in an AWS Service, such as an S3 bucket or object, or an EC2 instance.
For a Principal to perform an Action on a Resource (such as listing the contents of an S3 bucket), there need to be policies in place that grant allowances all the way through. Any denial at any stage will cause a failure to perform the Action on the Resource. AWS has a default policy for all Actions and Resources to all Principals: Deny.
Let’s illustrate this.
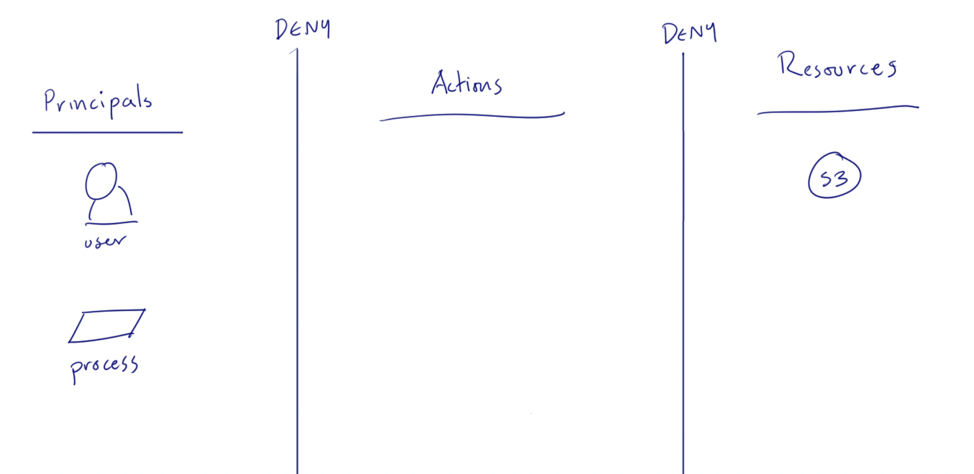
You see that vertical line between the Principals and Actions, and another between Actions and Resources? Let’s call those our “walls of denial”. Our job when building a secure S3 bucket is to poke holes through these lines only for those Actions needed for the Principal, and only on those Resources that are appropriate.
For AWS Principals, such as AWS users and resources (e.g., an EC2 instance with an IAM role association), we can use IAM to allow access to Actions and Resources. Here’s an example of an IAM policy that allows a group of actions on all S3 buckets in the account:
{
    "Version": "2012-10-17",
    "Statement": [
        {
            "Sid": "VisualEditor0",
            "Effect": "Allow",
            "Action": [
                "s3:GetObjectAcl",
                "s3:GetObject",
                "s3:GetObjectTagging"
            ],
            "Resource": "*"
        }
    ]
}
Note that there are sections in the policy for Actions and Resources, just like in our diagram. Note how we’ve made a hole in the deny wall between Principals and Actions for the three Gets defined in the policy, and that applies to all S3 buckets in Resources.
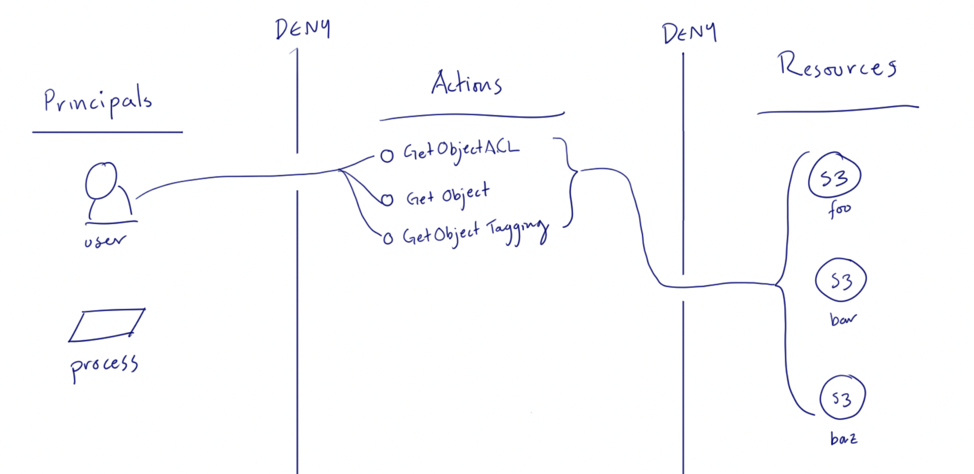
In this and in many cases, the Resources section is “*”, meaning all Resources behind that Action. This is often a good idea as we can use Bucket Policies and other means to scope down which Resources are allowed when all the policies are evaluated.
An important thing to consider when deciding where to declare specifics like resource names is that you want to avoid proliferating IAM Policies because keeping track of them becomes a source of both cost and risk. Therefore, embedding specific Resource identifiers in an IAM Policy is generally undesirable as it will lead to numerous copies of the policy. We will use S3 Bucket Policies to limit resource access at the bucket layer next, so that when deployed to a user or process, this policy doesn’t allow access to all S3 buckets.
We recommend using AWS Managed Policies wherever it makes sense, as there are already more than 700 of them in your account and AWS maintains them for you. Even if you don’t find one that is perfectly suited to your purpose, it’s worth using them as examples for how to hand craft well-made IAM Policies.
Bucket Policies
So now we have an IAM Policy that allows a number of Get actions against all S3 buckets in the account, but we probably want to narrow it down to just those S3 buckets that are needed for the application we're working on. There are several ways to go about doing this, but we recommend having a bucket policy on all your S3 buckets as a last line of defense.
Bucket policies are AWS policies that are applied at the individual bucket, and are a great way to deny requests that IAM policies might grant. In this example, we want the bucket “foo” to only accept actions that are initiated from two particular VPC networks. Let’s look at a policy straight from the AWS support portal for that.
{
  "Version": "2012-10-17",
  "Id": "VPCe and SourceIP",
  "Statement": [{
    "Sid": "VPCe and SourceIP",
    "Effect": "Deny",
    "Principal": "*",
    "Action": "s3:*",
    "Resource": [
      "arn:aws:s3:::awsexamplebucket",
      "arn:aws:s3:::awsexamplebucket/*"
    ],
    "Condition": {
      "StringNotEquals": {
        "aws:sourceVpce": [
          "vpce-1111111",
          "vpce-2222222"
        ]
      },
      "NotIpAddress": {
        "aws:SourceIp": [
          "11.11.11.11/32",
          "22.22.22.22/32"
        ]
      }
    }
  }]
}
Here we are asserting Deny on all Principals for all S3 Actions in the beginning of the statement, followed by a Condition that scopes down the denial to VPC Endpoints not equalling two VpcE identifiers and two CIDR blocks. Put another way, only Principals coming through those VPC Endpoints and within those CIDR blocks will be allowed any S3 actions at all.
When we combine these on the diagram, and putting this policy on bucket “foo”, and different bucket policies with different VPC Endpoints and CIDR blocks, we get:
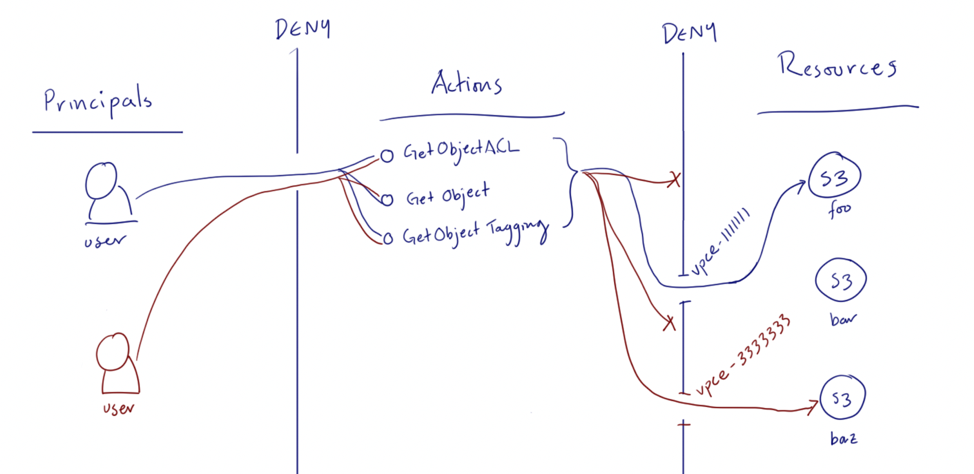
Here, the blue user is coming in through a VPC with the vpce-1111111 endpoint, but the red user is coming in via the vpce-3333333 endpoint. The bucket policy on foo deines the red user, even though she is using the same IAM policy as the blue user, because she’s coming from a disallowed VPC Endpoint.
So you can think of all these policies in a single evaluation, where any Deny means a denial of the request. Therefore, you can decide where to put Allow and Deny statements, based on your use case and architecture.
Block Public Access
We often hear that people think they are protected from breaches in S3 by turning on the Block Public Access feature in AWS. It’s a great feature. You should use it where appropriate, but it is far from what you might think in terms of blocking access, and you can’t assume by having it on, you are safe.
In AWS’ documentation, they state:
“To be considered non-public, a bucket policy must grant access only to fixed values (values that don't contain a wildcard) of one or more of the following:
- A set of Classless Inter-Domain Routings (CIDRs), using aws:SourceIp. …”
There is a lot more information in the document (which you should read), but that alone shows that a list of CIDR blocks with public access does not constitute “public” from the feature’s perspective. CIDR blocks can represent large chunks of the internet, so you could have a “non-public” bucket that is exposed to millions of IP addresses and think you’re safe. It’s always a good idea to use as narrow a bucket policy as you can for each S3 bucket.
A note about encryption
When you encrypt an S3 bucket, it’s important to use KMS keys or user managed keys for encryption because those methods require a hacker to have access to additional services or data to get decrypted information out of your S3 bucket. If you just turn on server-side encryption in its most basic form, you’re only getting encryption at rest within the S3 service, and any Principal with GetObject permissions will receive a decrypted form of the object(s).
If you have a regulatory requirement for all data at rest to be encrypted, this will check the box for you, But from a practical standpoint, doing this has little to no effect on your security posture.
There’s always more...
There are more features and layers of S3 security in AWS than we’ve covered in this post, some of which we touch on in our Cloud Security Masterclass series on S3 security. If you leave with one thought from this post, we hope it’s that you need to really understand AWS policy to understand S3 security, and that you can’t just rely on cookie cutter examples to master the topic.
If there are deeper topics on S3 security you’d like us to cover, please reach out and we’ll dig into them!
About the Author
Josh Stella is co-founder and CTO of Fugue, the company putting engineers in command of cloud security and compliance. Previously, Josh was a Principal Solutions Architect at Amazon Web Services (AWS), where he supported customers in the area of national security. Prior to Fugue, Josh served as CTO for a technology startup and in numerous other IT leadership and technical roles over the past 25 years.


Trending This Week
#1 The 5 SOC 2 Trust Services Criteria Explained
#2 What You Need to Know About the Daixin Team Ransomware Group
#3 Mitigating Security Risks in Retrieval Augmented Generation (RAG) LLM Applications
#4 Cybersecurity 101: 10 Types of Cyber Attacks to Know
#5 Detecting and Mitigating NTLM Relay Attacks Targeting Microsoft Domain Controllers
Related Articles:

Remote Code Execution (RCE) Lateral Movement Tactics in Cloud Exploitation
Published: 04/12/2024

“Toxic Combinations” are Inadequate: A Case Study
Published: 04/02/2024

The Elephant in the Cloud
Published: 03/29/2024

Powerful Cloud Permissions You Should Know: Part 1
Published: 03/26/2024