Using Open Policy Agent (OPA) to Apply Policy-as-Code to Infrastructure-as-Code
Published 04/02/2020
Originally published as: Pre-deployment Compliance Checks with Regula and Terraform
By Becki Lee, Senior Technical Writer, Fugue, Inc.
Infrastructure-as-code is a programmatic way of defining and provisioning cloud resources. By treating infrastructure configuration as code, you can apply programming concepts such as version control and modular design to managing cloud services. This strategy reduces the cost, time spent, and risk of error that come with manual methods of provisioning.
Originally published as: Pre-deployment Compliance Checks with Regula and Terraform
For these reasons, Fugue has open-sourced its tool Regula. Regula evaluates Terraform infrastructure-as-code for potential AWS, Azure, and Google Cloud security misconfigurations and compliance violations prior to deployment.
The open source Open Policy Agent (OPA) engine powers Regula's compliance checks. Compliance policies are written in Rego, OPA's query language, and check for misconfigurations such as unencrypted EBS volumes or overly permissive IAM policies. Regula validates the Terraform against a library of policies and returns a report of compliant and noncompliant files. You can customize which rules Regula uses to validate your Terraform, or even write your own if you're handy with Rego.
In this blog post, we'll demonstrate how to use Regula with GitHub Actions to alert you to noncompliant Terraform. This example uses our example GitHub Action in regula-action. However, you can use Regula with other CI/CD systems, such as Travis or CircleCI.
For a detailed version of this walkthrough, see regula-ci-example.
Ready to try it out? Let's go!

Prerequisites
2. Clone the regula-ci-example repo:
git clone https://github.com/fugue/regula-ci-example.git
3.Create, clone, and cd into a new GitHub repo (or an existing repo you want to set up with Regula).
Steps
1. Copy example files
For this example, we'll be using a GitHub Action that runs Regula on each git push to your repo. When triggered, Regula uses OPA to check Terraform files in the repo against a library of policies and, in this example, an additional custom rule. Then, Regula returns a list of the passing and failing compliance controls. If any Terraform files fail the compliance check, the workflow run itself fails. You'll see a summary at the end of the output either way.
To use this GitHub Action in your own repo, start by copying a few files from the cloned regula-ci-example into your repo:
- .github/workflows/main.yml -- the GitHub Action workflow file
- example_custom_rule/long_description.rego -- a custom compliance rule that requires IAM policy descriptions to be 25 characters or longer
- main.tf -- an example Terraform file that Regula will test
cd into the root of your repo if you haven't already. If your repo and the Regula repo are in the same directory, run this command to copy the files:
cp -R ../regula-ci-example/.github ../regula-ci-example/example_custom_rule ../regula-ci-example/main.tf .
2. Configure GitHub Actions workflow file
.github/workflows/main.yml contains configuration details for the GitHub Action. Let's take a look at the inputs you'll need to provide:
- terraform_directory specifies the directory containing the Terraform files. Here, it's set to . (the repo root), where main.tf lives.
- rego_paths specifies the paths of the policies that need to be passed to OPA. The default is /opt/regula/rules, but here it's set to /opt/regula/rules example_custom_rule, which also includes the rule in the example_custom_rule folder.
Since the file is already configured for this example, you can leave it as is.
3. Set up environment variables
Because Regula runs terraform init, the environment variables AWS_ACCESS_KEY_ID and AWS_SECRET_ACCESS_KEY must be set. Your AWS account will not be modified, but if you want to be absolutely certain about this you can always create a dummy IAM user within your account and allow programmatic access.
To set these variables, you'll need to create an encrypted secret in your repo for your user's AWS access key ID and secret access key:
- Navigate to your repo's Settings page.
- Select Secrets from the left sidebar.
- Enter AWS_ACCESS_KEY_ID as the name of your secret.
- Enter your ID as the value and click " add="" secret."<="" li="" >="" <="">
- Repeat the process for AWS_SECRET_ACCESS_KEY.
4. Commit the files
Next, we're going to add, commit, and push the files you've added to your repo.
- From the root of the repo, git add all three copied files:
git add main.tf .github/workflows/main.yml example_custom_rule/long_description.rego
git commit -m " add="" terraform,="" workflow="" file,="" custom="" rule"<="" span="">
3.git push to the remote repository:
git push
5. View the test results
Once you've pushed your changes, the GitHub Action will run automatically, and you can view the Regula test results in your repo:
- Navigate to your repo on GitHub and select Actions.
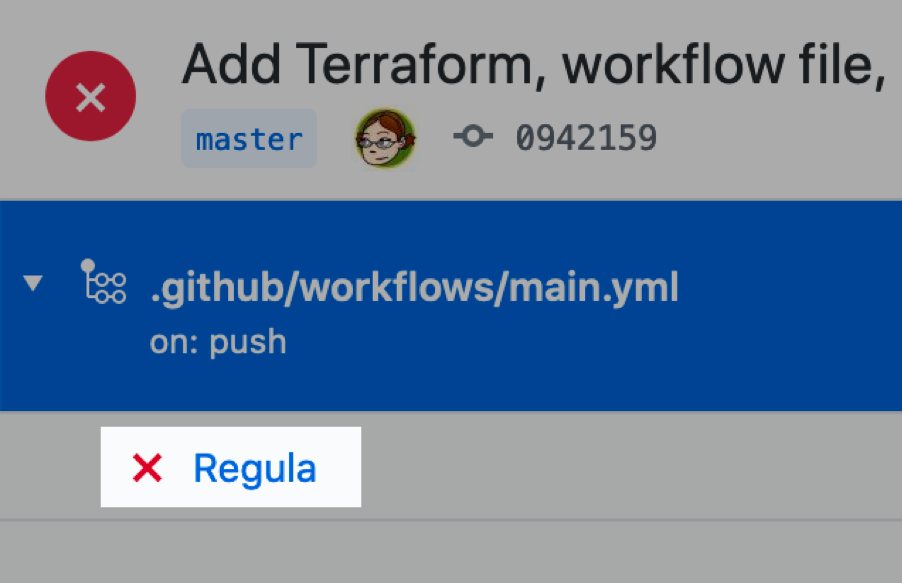
- Under All Workflows, select the github/workflows/main.yml event:

3. Select the Regula job in the left sidebar:
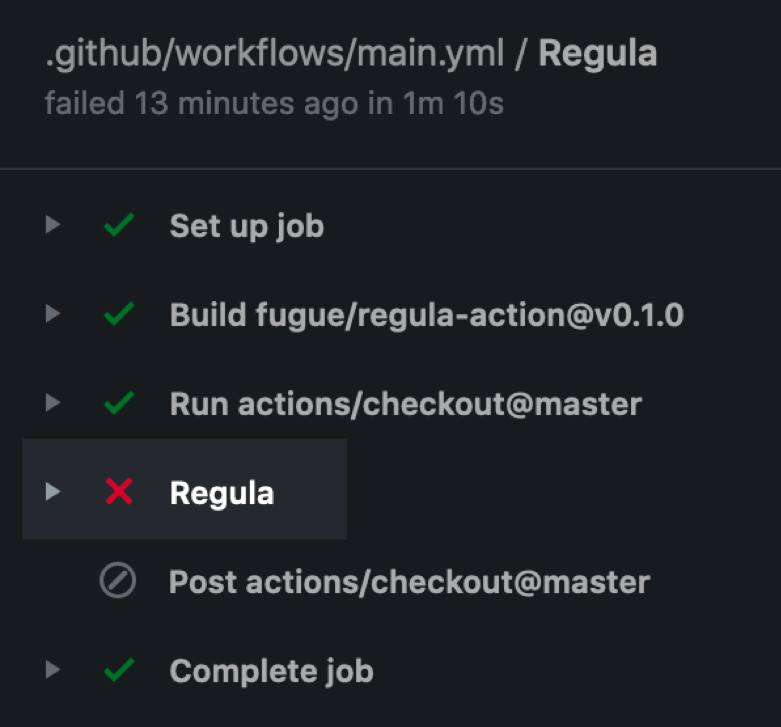
4.In the logs on the right, expand the Regula section:

6. Wait, what do the test results mean?
In the logs, Regula returns a list of controls and rules that passed or failed compliance, along with the names of every Terraform resource that passed or failed. (For an explanation of the difference between controls and rules, see the Regula README.) At the end of Regula's report, you'll see the compliance summary:
8 rules passed, 2 rules failed
12 controls passed, 2 controls failed
##[error] 2 rules failed
##[error]Docker run failed with exit code 1
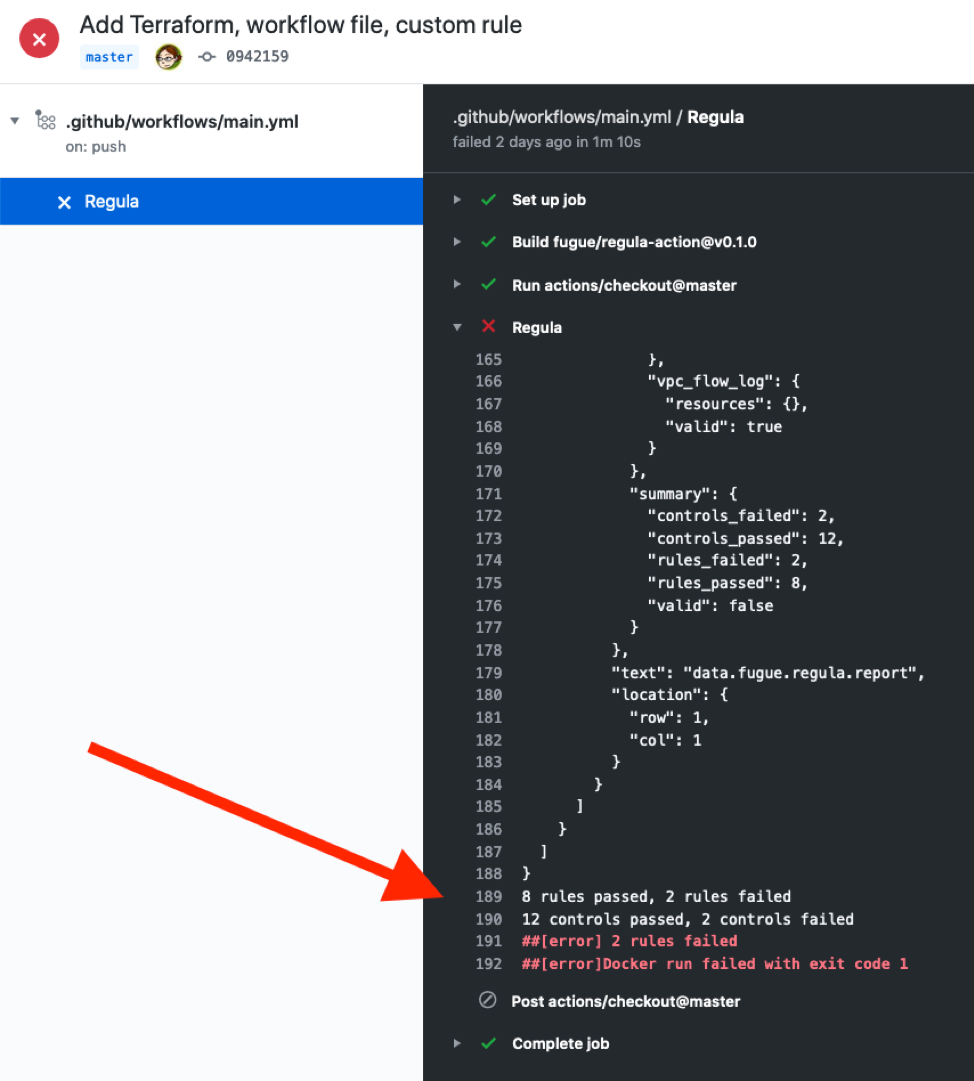
In this case, the test failed. This is great, because now we know there's a policy violation in our Terraform! (You'll also see this information in the summary block of the output a little higher up.)
Dig a little deeper and you'll see exactly which resources violated which controls or rules. In this example, the controls block shows that the Terraform is noncompliant with CIS_1-22, and the mapped rules that failed are listed underneath (iam_admin_policy). And the rules block further down indicates that the resource aws_iam_policy.basically_allow_all failed the mapped rule, while aws_iam_policy.basically_deny_all passed:
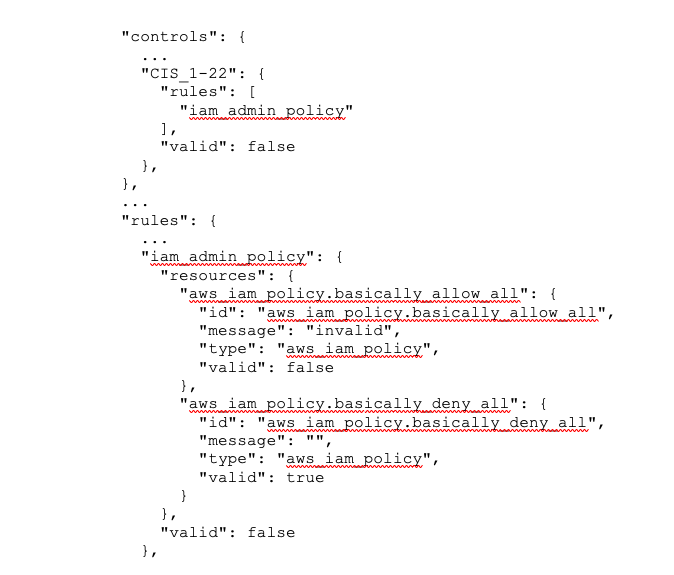
The resource aws_iam_policy.basically_allow_all also failed the custom rule long_description:

As you can see, the Regula check failed because one of the IAM policies violated the iam_admin_policy.rego rule by granting overly permissive access, and it also violated the custom rule long_description.rego by having a description shorter than 25 characters.
You can see the full results in action in our live example.
For more information about Regula test results, see the Regula README.
What's Next?
This tutorial showed you how to implement Regula using GitHub Actions, but you can use it with other CI/CD systems. For example, see our sample Travis configuration. You can also further customize this GitHub Action; to get started, check out the docs for configuring a workflow.
Further Reading
For the full version of this walkthrough, see regula-ci-example. The GitHub Action we used is in regula-action.
We encourage you to explore using Regula in your own CI/CD pipeline! For more information about Regula and how to use it, check out these resources:
For more blog posts by Becki Lee, please go to https://www.fugue.co/blog
Unlock Cloud Security Insights
Subscribe to our newsletter for the latest expert trends and updates
Related Articles:
How CSA STAR Helps Cloud-First Organizations Tackle Modern Identity Security Risks
Published: 02/13/2026
The Great Divide: How AI Is Splitting the Cybersecurity Landscape
Published: 02/12/2026
Global Privacy Trends and Best Practices for Compliance in 2026
Published: 02/04/2026




.jpeg)